
3.0 Preparation
For highest transfer rates we recommend to connect the CineStation® IV
via 10G Ethernet to your computer.
You may have to install third party
drivers for your Ethernet hardware,
in advance. The following steps
demonstrate how to setup network preferences, using an external Thunderbolt to 10GbE adapter such as
Promise Technology SanLink 2. We
also tested ATTO ThunderLink NT
1102. However, o/PHANTOMFUSE will
work with any macOS compatible Ethernet interface.
3.1. Connections
31.1. SanLink 2 to Computer
31.1. SanLink 2 to Computer
Power the SanLink 2 and connect it with your computer, by using an
appropriate Thunderbolt cable.
3.1.2. CineStation IV to SanLink 2
Use the 10GbE interface of your CineStation IV and connect it with
one of the two provided Ethernet interfaces of SanLink 2, by using an
appropriate 10GbE cable.
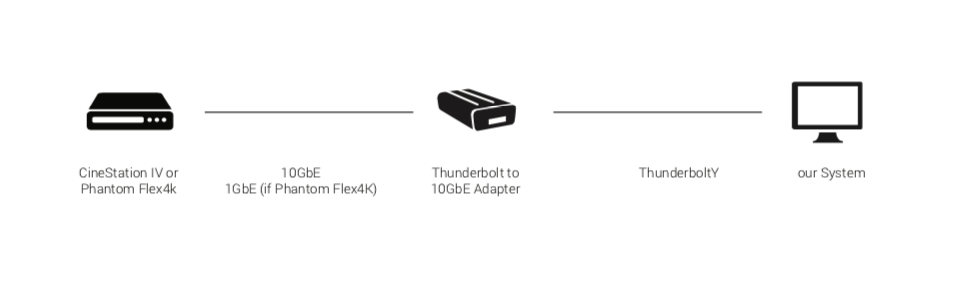
Your setup now should be similar to the illustration displayed below. The CineStation IV is connected to a Thunderbolt to 10GbE adapter, which is connected to your computer. Alternatively you can use a built in network interface.
3.2. Tested Components
- Phantom Flex® and Flex4K®
- CineStation B and IV
- OS X 10.10 Yosemite, 10.11 El Capitan and macOS 10.12 Sierra
- SANLink2 10GBase-T
- ThunderLink NT 1102 (10GBASE-T)
Besides the tested devices o/PHANTOMFUSE can be used with any macOS compatible Ethernet interface.
3.3. Driver Installation
Install third party driver software for your network interface or Ethernet adapter and check the functionality of your device.
3.4. Network Preferences
The CineStation IV provides both, a 1GbE and a 10GbE port. The camera only provides 1GbE. The corresponding IP addresses are displayed on the devices.
The XIP address of the CineStation IV is used for 10GbE, the IP address for 1GbE connection. If you set up a network, it is important to use the same subnet as the connected device. However the IP respectively XIP address of your network has to be different.
3.4.1. Defining Subnet Mask and IP Address
The following example uses notional IP or XIP addresses. However the demonstrated configurations below can be used in most cases.
Let's say the XIP address of our hypothetical CineStation IV is 172.16.17.64. Therefore the corresponding subnet is 172.16.0.0/16. For setting up a network connection, we can use any IP address between 172.16.0.1 172.16.255.254, but not 172.16.17.64. In addition, the subnet mask should be 255.255.0.0.
Example IP / XIP values and corresponding subnets
| Device IP / XIP | Subnet 1GbE / 10GbE |
| 100.100.146.105 | 100.100.0.0/16 |
| 172.16.17.64 | 172.16.0.0/16 |
Resulting Network Settings
| Subnet Mask | 255.255.0.0 |
| IP for 1GbE | 100.100.100.1 |
| IP for 10GbE | 172.16.0.123 |
3.4.2. macOS Network Settings
- Go to System Preferences and open Network
- In the left column, select the corresponding network interface
- At Configure IPv4 select Manually
- For IP Address use: 172.16.0.123
- For Subnet Mask use: 255.255.0.0

Set Configure IPv4 to Manually
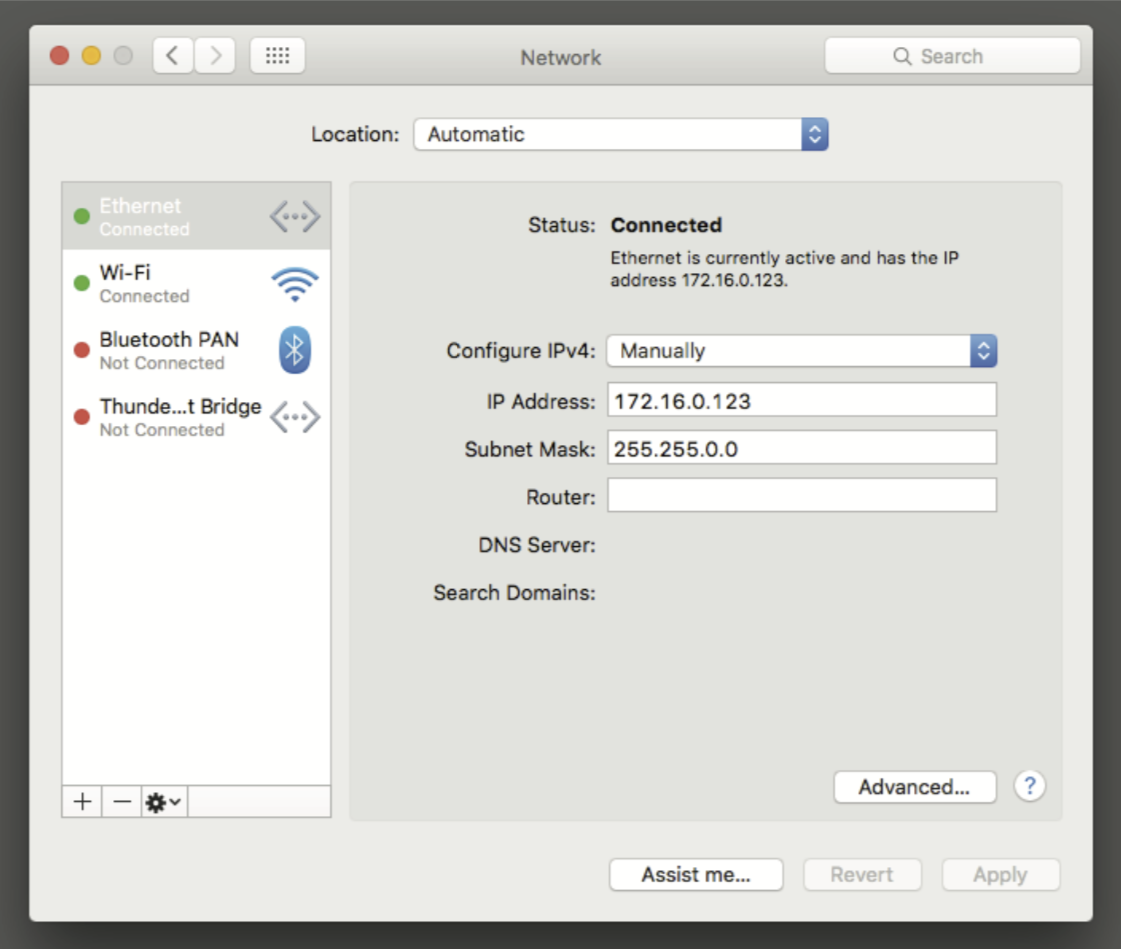
IP Address: 172.16.0.123
Subnet Mask: 255.255.0.0